Image

I’ve been away from the blog for a while….   Last winter, my husband Mike decided to make a kitchenette for the back of our mini-van.  Easy storage for food and utensils for day trips away from camp.  Lots of photos were taken….

20150111_161956


We knew we needed a cooler and have found milk crates useful for many odds and ends.

20150111_162233

20150111_162312

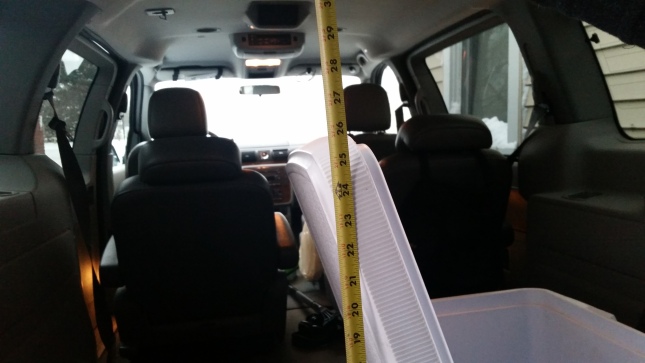
Careful measuring of the height with the lid open and overall width were needed.

20150114_194316

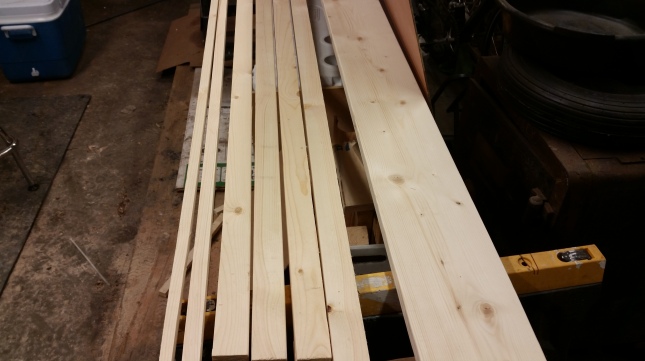
Regular 1 X 8 boards were ripped down to narrow width to provide framing.

20150114_194046

A step drill bit was used to pre-drill for the screw pockets.

20150114_194104

Joints were glued and screwed tight.

20150114_194133


20150114_195847

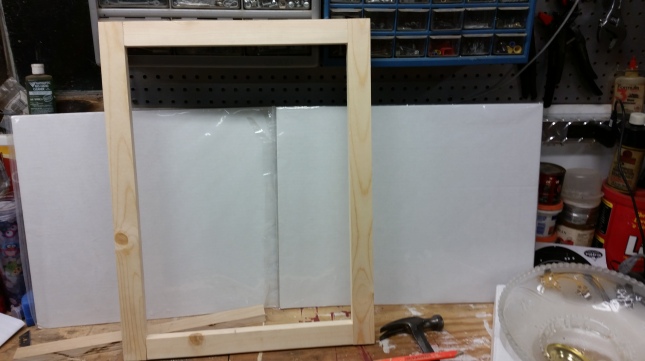
Square ends were made…

20150114_200021

Several test fittings in the vehicle as work progressed.

20150115_173316

Center supports and were made and attached to the top.  They were also attached top and bottom on the back side.

20150115_163454

A cutting board was traced and a recess was routed into the top to keep it from sliding around.

20150114_193733

20150114_193804

Tapered sides were added to the top to keep items like paper towels, bags of chips or other light items from falling off.  The top and upper sides were made from scrap plywood that I had.  I suggest ¾” high quality plywood for strength and longevity.  A ½ sheet should work, depending on your width.

20150125_174804

The lower unit had thin plywood bottoms fitted in the two outer sections and paneling glued and stapled to the framework.  One sheet was enough to cover what you see here.  The bottoms, top and exposed wood were sealed with several coats of polyurethane sealer.

20150124_133445

Several types of plastic storage bins were purchased and test fit.  We chose the green ones. Shelves were added above the milk crate and above the big box which lives on the right side.

20160825_194719[1]

The container shown sitting on the orange milk crate has a top silverware drawer.  We stock essentials such as cleaning sponge, dish soap, silverware, inexpensive paring knife, wine bottle opener and disposable silverware.  We carry both paper and plastic dinner plates that can be washed.

Summer Vacation and College Tours 2015-07-25 089

We found the storage boxes keep bread from getting smushed.  The milk crate is used for boxed items and cans.  Crackers, cookies, etc. can be quickly taken to/from the trailer and the van.  Other items in the storage boxes include sunscreen, hats, bug spray, rain coats, disposable table cloth (although ours gets reused several times), paper towels, plastic (washable) cups/wine glasses.


The cooler goes in the center section and there’s plenty of room for a small camp stove and a pan or two if you want hot food.  We’ve used the kitchenette several times this summer and found the open back door shelters you well in light rain and wind, depending on how you are parked.  I am able to comfortably prepare vegatables for salads, cut meats and cheeses, etc.


The unit is secured with small screws to each side of the van, it removes easily and the holes are very small and reusable, with care.  While traveling, the counter top makes a nice place to lay out wet towels or swimsuits.


Image

Michigan Wine and Steak Dinner

Here is a painting that I did a few years ago during a "Wine and Canvass" event.

A painting that I painted a few years ago during a “Wine and Canvas” event.

Being from Michigan’s wine country, there’s nothing better than a good red wine with a seasoned steak cooked over an open fire. We tend to choose a steak with extra fat marbled in the meat for tenderness and flavor when we grill.  Maybe you do too.  People often know how to choose a good steak, but they aren’t sure which bottle of wine will go well with their meal.  Yes, I said a bottle.  I’m not a fan of the plastic wine bags and boxes, although they do travel well and keep the air out of the wine.  We take a real bottle and cover it in a mesh bag to keep the bottle from breaking.  Wine will add depth to the flavor of your meal, and impress your wine loving friends (many whom don’t drink beer.)

Here’s an easy to remember rule of thumb.  According to Wine Folly, the fattier the cut of steak, the darker the wine (color=the amount of tannin).  Though I often limit myself to packing from the wine choices we have on our shelf, we do loosely follow this wine rule.  If I’m hitting the grocery store (Meijer’s) on the way to camp, I give some thought to what will pair well with our Saturday night BBQ.  Read on for a few really tasty Michigan wine recommendations.

Fall is a wonderful time to take a color tour in our area, and we often end up at a new winery for a tour and tasting.  Now that Mike has restored our vintage Mustang, we always want to take a drive – anywhere!  Lemon Creek Winery is one of our old favorites.  They make an award-winning, dark red Cabernet Franc that my husband loves.  It pairs really well with rich, red meat dinners.  If you like a dessert wine, their Cherry Wine tastes just like cherry pie so I serve it as a dessert.  Or with a dessert.  It went REALLY well with some not-too-sweet dark chocolate truffles last Valentine’s Day.

Tabor Hill is another favorite, local winery of ours.  They are known far and wide for their demi-sec red and white wines, which are both semi-dry.  People who say they don’t like wine, and those who are just starting to develop their pallet, often like these two wines which are served at the White House.  For those who have developed an appreciation for drier wines, the affordable table wines we like are Red Arrow Red and Pinot Gris.  The downside to camping with a white wine, like a Pinot Gris, is chilling it.  Pack your white wine in a “wine-cozy” to keep it from breaking.  This will also keep it cold when it is out of the cooler on the boat, or at the beach!

79300_a1_gSo how do I serve the wine in on a camping trip?  Our answer is plastic, collapsible wine stemware.   We have also packed the little wine glasses that you get during a winery tour, but they add weight and can break so we “rough it”.   You’ll need to pack a tool that includes a wine bottle opener and a separate pour spout cork.  If there is, by chance, any left overs the next day, add it to a stew.

Meijer stores carry all of the wines mentioned above. While you’re there, pick up some Faygo pop for the kids!  It’s fun to try new foods, so I’m always looking for something new to try.  Today, I happened to see a California wine called Happy Camper, and it sounds delicious!  Maybe it’s just the name?  Having watched this video, I’m ready to have a taste.  The owner says that KOA campgrounds and others carry it in their store.  I may give our local KOA a call.  Have you ever tasted Happy Camper wine?  If so, how did you like it?

I love to hear how people live.  Let me know what wines you like to bring on a road trip, or to the campground.  Do you use a river to keep the wine chilled?  What do you serve it with at camp?  Don’t forget to follow my page.  Happy Camping!

Image

Hello WordPress Folks – Meet The New Kid

Hi, I’m Tammy, the new kid at WordPress.com.  I moved here last week from Blogger, quite by accident.  I am looking to meet some new friends, and I’m hoping that you are kind enough to help me out.  My goal is 100 Facebook Page likes, 100 followers on Twitter, and 600 Pinterest followers.  Here’s my story:

I started a travel blog a couple of years ago.  I read a couple of books, learned some of the jargon and tried some of their advice.  I found out that I wasn’t very good at generating web traffic, or finding new readers, and I didn’t really get coding.  Yes, I had started a Facebook page and a Twitter account and a lot of other stuff that the books has suggested, but I wasn’t very good at getting folks to click and become my friends.  I listened to several podcasters, like Social Media Marketing, but I didn’t seem find the people I wanted to reach.  Blog failure wasn’t the worst thing.  I could still post road trip photos for grandma while I was on vacation instead of using Facebook and risking a home break-in.

Fast forward to last week Monday’s scout troop meeting.  I’m the volunteer who maintains our troop website via a professional service.  Our troop is considering moving the website to Wordpress.com.  I didn’t know what to expect from WordPress.com, so I decided to import my blog from Blogger and check it out.  I wanted some content to work with and shuffle around.

When I was blogging, I had followed the advice at Code It Pretty, but my blog never looked very great.  Instead of going this route, or reading books, I watched a few YouTube videos this time to learn my way around.  Wordpress.com is SO much easier than what I had tried to do!  I think my blog looks more inviting, but I still haven’t made any new friends.  I also have a lot to learn, as I am looking for ways to get Twitter to post a photo with my new post links and rich text recipes to show up on my Pinterest boards.  I am kind of Pinterest nut, with many boards devoted to camping and would surely love to add my tutorials and recipes to their lunchbox full of ideas.

As I was creating new blog categories, and filling in photos, I ran a crossed some recipe pics that I had meant to use in a post.  I guess I never got it done.  Have any of you ever done this?  Anyway, I decided to write a short post yesterday to add to my “Before You Go” group of recipes.  Maybe someday, someone would see it and add it to their campout menu.  Whatever.  Right?  So, here is the amazing part – people that I don’t know read my post AND LIKED IT!  Seriously!  A few WordPress folks, essentially, said “Hello” to me in the hall.  That’s amazing to me because that never happened on Blogger.  Ever.  So thank you for being friendly, and for stopping by.  Being the new kid kinda sucks, but I’m thinking, now, that maybe I’ll try sharing a few more posts about what I know – camping and cooking.

I’m hoping that by switching to WordPress.com, I’ll find new campers that have questions and new readers that will share their stories.  Thank you, thank you, thank you for stopping by and clicking around!  I hope you’ll introduce me to your readers, fans and people you know that enjoy road trips and the great outdoors.  Please leave a comment to keep the conversation going.  Newbie advice from bloggers would be appreciated.

Happy Camping!

Image

South In Your Mouth

South In Your Mouth 2014-02-18 007It’s a dip, or a cheesy skillet meal, or whatever your family likes best!  Cheese is the main ingredient to this wonderfulness, and everyone loves it.  Make it in a skillet at camp, or at home and warm it up at camp in a crock pot.

This is an easy recipe to make, as it uses pre-cooked chicken.  You can whip it up in no time with a rotisserie chicken or leftovers turned into something you’ll love.

South In Your Mouth 2014-02-18 002South In Your Mouth 2014-02-18 001


If you are making this ahead of time, and have a Kitchen Aide mixer, here is a trick: use the paddle to shred your fully cooked chicken in seconds!


South In Your Mouth


Ingredients
2 cups of uncooked rice
2 cups cooked chicken (more or less is fine), shred or dice
1 jar Salsa Con Queso
1 bag frozen Broccoli or California Vegetables, thawed
1 bag of Scoops tortilla chips

Directions
In a skillet, cook rice according to directions. Add chicken and heat through. Stir in a bag of vegetables and heat for several minutes. When everything is steaming, stir in the jar of Salsa Con Queso. Stir constantly for 3 minutes over low heat. Serve as a casserole or in a bowl with tortilla scoops. Enjoy!

Let me know if you like it.  Happy Camping!

Image

How To Camp In A Jucy at Yosemite – Part 2

Food, and it’s storage bear country, is critical.  Yes, we saw a HUGE brown bear and boy was I glad that we weren’t having dinner out of the back if my Jucy!

Bear Box Storage Tutorial

A cheap cooler like this worked just fine for storing refrigerated items overnight with a bag of ice from the campground store.

At night, you’ll need to store ALL of you food and smellables in the bear box, including your refrigerated items. We bought a small cooler and ice most days. Repurposing a six-pack carrier worked well to easily move condiments back and forth from the van kitchen.   During the day, I used the dry sink to hold our crushable picnic supplies. At night, it all went in a bag in the bear box.

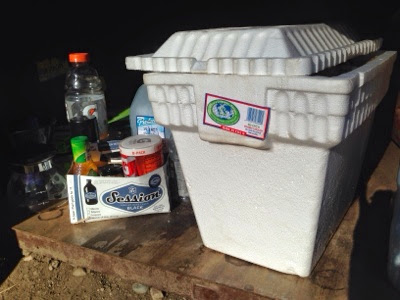
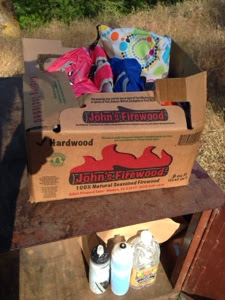
My final bear box tip is to put your “smell-ables” in an empty firewood box. People often leave an empty box for the next person using the bear box, maybe even with some newspaper fire starter. We love people who pay it forward!  The box is a good way to gather your sunscreen, medications, shower items, etc. and it protects them from exploding food. Yes, you read it right.  We brought a 12 pack of pop up to the mountains and one of the seams broke. A minor, but very sticky, mess since we had the woodbox to protect our stuff. We’ve also had mustard explode in the mountains.  Lesson learned – cover your stuff!
How do you camp in bear country?  Leave a comment with your tips, or questions, and don’t forget to follow my blog.  Happy camping!
Image

How To Camp In A Jucy at Yosemite – Part 1

Over the past seven days, the kids have counted 26 people or families that have stopped to ask us about the Jucy. Since there is so much interest, I thought we’d write a series of reviews.

There are as many ways to camp as there are places to camp. If you are like us, we were a bit nervous about rentingaJucy camper van without seeing one, or even knowing someone who recommended it. Fear not, this is an awesome set-up! With a little advanced planning, you’ll have a great family vacation.

Sleep Warm
Warm campers sleep well all night and wake up happy the next day.TheJucy comes with bedding, but maybe not enough depending on the altitude you’ll be staying at. For instance, it’s the middle of June, and look at the low, morning temperatures:

This morning I woke up at 8:00 and it was still cold at 55*.  Two hours later, the temperature had risen 30*, I kid you not, and I needed shorts.  We read someone else’s review about the bedding and packed two red blankets that people pack for the plane, and two fleece sleeping bag liners for the kids.

Blog 2014-06-28 003

The red zippered bags hold the travel blankets, free from a conference. On the left and right are two sleeping bag liners, purchased at Dick’s Sporting Goods.

We also packed long-sleeved pajamas/base layers to sleep in. Nathaniel did pack his summer, mummy sleeping bag because it’s light (and he loves it), but I don’t think he really needed it. With all the windows closed, we are quite warm and comfortable at 6,000 feet.  Upstairs, the penthouse stayed warm, too.  If it were earlier in the year, or higher altitude, a knit hat and gloves might be warranted.

Finally, make sure you park each night in an area that is level, or with your head up hill.  As this photo shows, we have our bed reversed from what the company shows in their photos.  During the day, we simply “jelly roll” everything and put it in the penthouse with the pillows and camp chairs while we are driving.
If you have questions about renting a camper van, or tales to tell about your experience, please comment to keep the conversation going.  As always, we hope you’ll follow our blog either here or on Facebook.  Happy Camping!
Gallery

Yosemite Or Bust

Our first night in the Jucy, we stayed at a campground called the 49ers.
They were so friendly!  When we checked in, they pointed us toward the brat dinner.  No set cost, just a donation.  One gal said “We’ve saved many a marriage with our Friday night cookout.” Later, a cowboy named Cricket entertained folks around the campfire with songs and stories. Everyone loved his original songs.  If you are looking for a highly recommended campground, click here:  http://www.49errvpark.com/
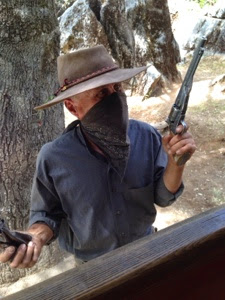
The next morning, we walked next door to Columbia State Park. They have a gold mining town replica, and many costumed interpreters. We decide to ride the stage-coach, and got robbed!!!  The pulled chicken BBQ and sarsaparillas were wonderful at the country restaurant, and we bought 5 hard candy sticks for a dollar at their grocery store. The blacksmith and tack shops are a must see, as well as the candle shop where the kids dipped candles for Father’s Day.
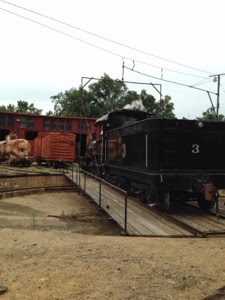
Jamestown was our last stop before heading to Yosemite. We missed the last train ride of the day, but saw the famous #3 steam engine ride the roundhouse and be put away for the evening.  This train has been in countless movies and TV shows over the years, and is still being used in films.  The guys really likes looking around at all of the equipment.
If you’ve visited these parts, or have questions about this area of California, please leave us a comment.  We’d love to hear from you, or see a new like on our page.  Thanks!
Gallery

Good Bye San Francisco, Hello Jucy

Before leaving the San Francisco area, we took some iconic photos of Lombard Street in bloom (ahhhhh) and the Golden Gate Bridge from Sterling Park. They were just beautiful!  I still can’t get over the grade of the streets. I think my ankles now have muscles.
Uncle Rob was a jem and drive us to the Juicy rental. Given all the other colorful murals we’ve seen on the outside of the rental RV’s, we’re pretty lucky.   We got the full tour of our nearly new van, and she even threw in some partial fuel tanks upon request. We stopped at a bakery outlet about two blocks away, and away we drive toward Yosemite.
Gallery

San Francisco with Uncle Rob

Uncle Rob wanted to get out of the house and show us around town. He drive us passed city hall, Twitter and alike, then we went to the Ferry Market. At the market, we purchased wonderful foods for our camping trip, like aged cheeses and smoked salmon!  We had a wonderful lunch at their favorite restaurant, Crapevine. The last photos are on top of Twin Towers, where we could see both the Bay Bridge and the Goden Gate Bridge. It was so windy.  Look at the tree in the background!